
MacBooks are known for their speed, smooth experience, and beautiful design. But even the best Mac can slow down when storage runs low. If you have seen the dreaded “Your disk is almost full” message, you are not alone. Many Mac users struggle with limited space, especially on models with only 128GB or 256GB SSDs. The challenge: you want to clean up your Mac, but you cannot risk deleting important files for work, study, or memories.
How do you free up storage on your MacBook without losing what matters? The good news is, you do not have to choose between space and safety. With smart strategies and a few built-in tools, you can reclaim gigabytes of storage while keeping all your vital files.
This article explains exactly how to do that — step by step, with clear examples, practical tips, and solutions even experienced Mac users sometimes miss.
Why Storage Gets Full On A Macbook
MacBooks use solid-state drives (SSDs), which are fast but often smaller than hard drives on older computers. Files, apps, and system data add up quickly, but space is used in ways many people do not see.
- Large media files: Photos, videos, and music libraries can easily take dozens of gigabytes.
- Duplicate files: Downloading the same file twice or copying folders creates hidden space waste.
- System files and caches: MacOS and apps create cache files, logs, and backups.
- Old downloads: Files in the Downloads folder are often forgotten.
- Unused apps: Apps you never use can still take up gigabytes.
- Mail and Messages: Attachments are downloaded and stored locally.
- Virtual machines and backups: Tools like Parallels, VMware, and even Time Machine snapshots use big chunks of storage.
Important insight: Mac storage can fill up even if you think you are not saving much. System and “Other” files are often the hidden culprit.
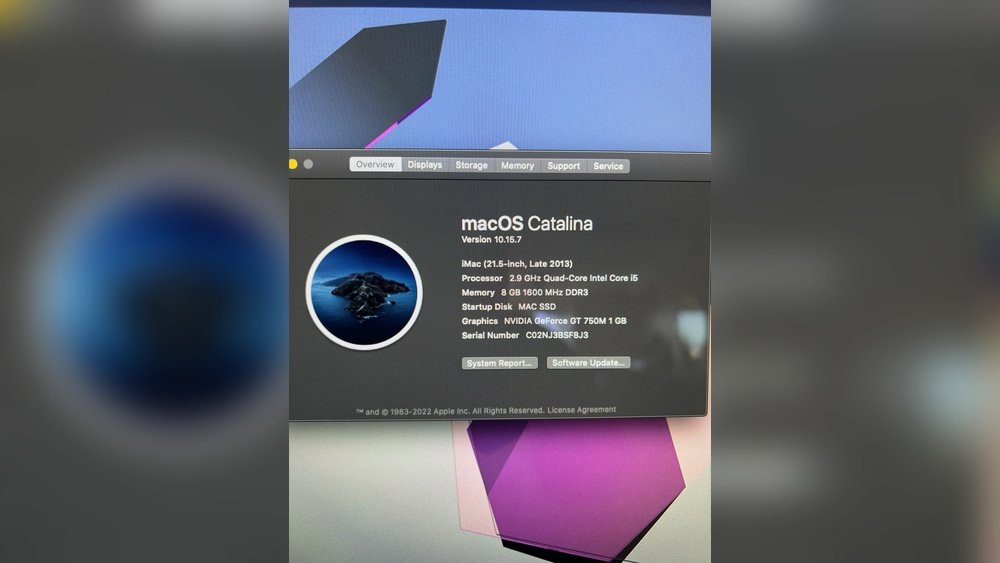
Check Your Macbook Storage: What’s Using Space?
Before you manage storage, you need to know what is taking up space. MacOS makes this easy.
- Click the Apple menu () in the top left.
- Choose About This Mac.
- Click the Storage tab.
You will see a color-coded bar showing how much space is used by Documents, Photos, Apps, System Data, and Other. For more detail:
- Click Manage… to open the Storage Management window.
- Here, you can review large files, unused apps, and recommendations.
Pro tip: The “System Data” or “Other” category often includes caches, logs, and files you can safely clean, but not delete directly from Finder.
Use Macos Storage Management Tools
MacOS offers built-in ways to free up space without deleting important files. These tools are safe and automatic.
Recommendations Panel
The Storage Management window shows suggestions at the top:
- Store in iCloud: Moves files, photos, and messages to iCloud, keeping only recent files on your Mac.
- Optimize Storage: Deletes watched movies/TV shows from Apple TV and old email attachments.
- Empty Trash Automatically: Deletes items in Trash after 30 days.
- Reduce Clutter: Finds large or old files for you to review.
Practical advice: Start with these tools — they are designed to protect your important data while freeing space.
How “store In Icloud” Works
If you have enough iCloud storage, macOS can automatically offload files to the cloud:
- Recent and frequently used files stay on your Mac.
- Older files are stored in iCloud and downloaded only when you open them.
- Your files are always visible in Finder, with a cloud icon showing online-only files.
Important: This does not delete anything, but you need an internet connection to access offloaded files. Be sure your iCloud plan has enough space.
Optimize Storage For Tv And Mail
If you use the Apple TV app or Mail:
- Watched movies and shows are automatically removed from your Mac.
- Only recent email attachments are kept locally; older ones are stored in iCloud.
Auto-empty Trash
Many users forget to empty the Trash. Turn on “Empty Trash Automatically” so deleted files are gone after 30 days, saving space without risk.
Safely Clean System And Cache Files
System files and caches can become large over time. While you should not delete core system files, cleaning caches is safe and can free gigabytes.
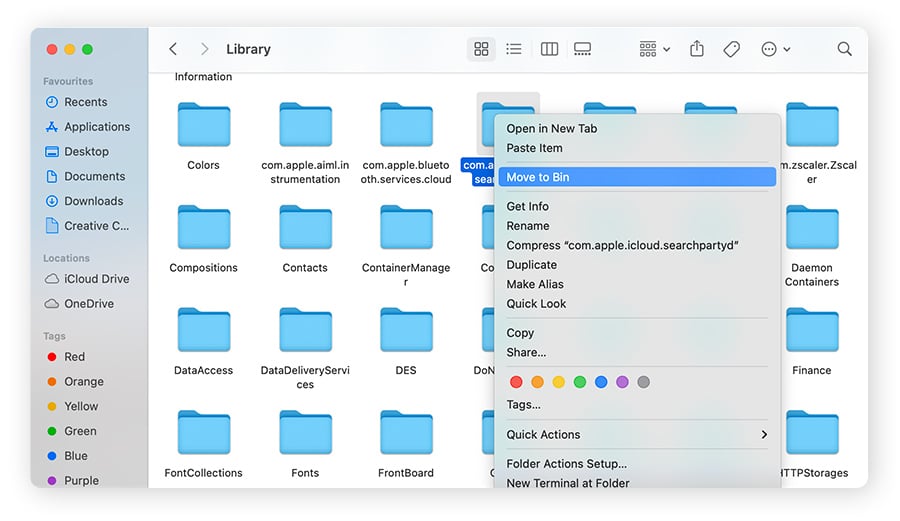
Clear User And App Caches
- Open Finder.
- Press Command + Shift + G.
- Enter ~/Library/Caches.
- Select files and folders inside (not the Caches folder itself) and move them to Trash.
Repeat for /Library/Caches (for system-wide caches; you may need admin rights).
Warning: Do not delete folders you do not recognize; focus on large files inside app-named folders.
Remove Old Ios Backups
If you have synced iPhones or iPads, old device backups can use gigabytes.
- In Finder (macOS Catalina or newer), connect your device and check the Backups section.
- In iTunes (macOS Mojave or older), go to Preferences > Devices.
Delete backups for devices you no longer own.
Less obvious tip: Even if you never backed up an iPhone to your Mac, apps like WhatsApp or iMazing may create device backups.
Find And Remove Large Unneeded Files
You do not have to delete important files to save space. Start with files you no longer need.
Use “documents” In Storage Management
In the Storage Management window, click Documents. This sorts all files by size and last accessed date.
- Review the largest files first.
- Move files you want to keep to an external drive or cloud storage.
Search For Large Files With Finder
- Open Finder and press Command + F.
- Select “Kind: Any” and set “File Size is greater than 100 MB” (or another size).
This finds large files, even hidden ones. Be careful with files you do not recognize — search online if unsure.
Comparison: Built-in Tools Vs. Third-party Apps
Some users prefer apps like DaisyDisk or CleanMyMac for visualizing large files. Here’s how they compare:
| Feature | macOS Storage Management | DaisyDisk / CleanMyMac |
|---|---|---|
| Built-in & free | Yes | No (paid) |
| Shows all file types | Yes | Yes |
| Visual graphs | No | Yes |
| Can delete directly | Yes | Yes |
| Safety checks | High | Medium |
Advice: For most users, Apple’s tools are safest. Third-party apps are helpful for advanced users, but always check what will be deleted.
Move Files To External Storage Or Cloud
When your MacBook’s internal drive is too small, the easiest solution is to move large files elsewhere. This way, you keep everything but free up space.
Use External Hard Drives Or Ssds
Photos, videos, and old documents can be safely moved to an external drive.
- Use a fast SSD for better performance.
- Name folders clearly (e.g., “Photos 2019-2022”) for easy searching later.
- Always eject external drives safely to avoid file corruption.
Cloud Storage Options
Services like iCloud Drive, Google Drive, Dropbox, and OneDrive let you store files online.
Comparison of Popular Cloud Services:
| Service | Free Space | Best For | Works with macOS Finder? |
|---|---|---|---|
| iCloud Drive | 5GB | Mac/iPhone users | Yes (built-in) |
| Google Drive | 15GB | Sharing, cross-platform | Yes (with app) |
| Dropbox | 2GB | Team sharing | Yes (with app) |
| OneDrive | 5GB | Microsoft users | Yes (with app) |
Less obvious insight: Most cloud apps let you choose which folders sync locally. You can have access to your whole archive online, but only keep current projects on your Mac.
Set Up “online-only” Files
Both iCloud Drive and third-party cloud apps allow you to keep files “online-only.” On iCloud, this is called “Optimize Mac Storage.” On Google Drive, it’s called “Stream files.” This saves local space but requires internet to access those files.
Tip: Never keep your only copy of an important file in the cloud; always have a backup.
Credit: www.avast.com
Manage Photos And Videos Without Losing Memories
Photos and videos are usually the biggest space hogs. You can keep them safe and still free up space.
Use Icloud Photos
With iCloud Photos turned on:
- Your entire photo library is uploaded to iCloud.
- “Optimize Mac Storage” keeps smaller versions locally; originals are in the cloud.
- You can still see all photos in the Photos app, but full-res images are downloaded only when needed.
Key fact: iCloud Photos works across all Apple devices. Deleting a photo in Photos app deletes it everywhere, so be careful.
Export And Move Old Photos
If you do not want to pay for more iCloud storage, you can export old photos and videos.
- Open Photos app.
- Select photos or albums to export.
- File > Export > Export Unmodified Original.
- Save to external drive or cloud.
Delete exported photos from your Mac to save space, but make sure they are backed up.
Use Third-party Photo Storage
Apps like Google Photos offer free storage (up to a limit). It can automatically upload and organize your photos, then you can remove them from your MacBook.
Insight: If you use Google Photos, photos are still accessible from any device with internet, but not stored on your Mac.
Clean Up Mail, Messages, And Attachments
Emails and messages (especially with large attachments) can quietly fill up your drive.
Manage Mail Storage
Apple Mail downloads attachments by default. To save space:
- In Mail, go to Preferences > Accounts.
- Set “Download Attachments” to “Recent” or “None.”
For older attachments:
- Search for emails with large attachments.
- Save important attachments elsewhere.
- Delete the email or remove attachments (Message > Remove Attachments).
Messages App
Messages with photos or videos can take gigabytes. To manage:
- Open Messages > Preferences.
- In the “General” tab, uncheck “Save history when conversations are closed.”
- Delete old conversations with large attachments.
Hidden tip: You can search for all attachments by clicking the “Details” button in a conversation.
Credit: www.itarian.com
Delete Unused Apps And Their Leftovers
Apps often leave behind supporting files even after you uninstall them.
Remove Unused Apps
- Open Finder > Applications.
- Drag unused apps to Trash, then empty Trash.
Delete App Support Files
Some apps store data in ~/Library/Application Support and ~/Library/Preferences. To clean up:
- After uninstalling, open Finder and press Command + Shift + G.
- Enter the paths above.
- Look for folders named after deleted apps and remove them.
Caution: Only delete folders for apps you are sure are gone.
Use App Cleaners Carefully
Tools like AppCleaner can remove both the app and its leftovers. These are safe for most users, but always double-check the files to be deleted.
Manage “system Data” And “other” Storage
“System Data” (formerly “Other”) is where macOS puts caches, old logs, disk images, plug-ins, and more. It is hard to clean, but there are ways to reduce it.
Remove Old Ios Updates And Installers
Installer files (macOS updates, Xcode, etc. ) Are often forgotten.
- Search Finder for .dmg and .pkg files. Delete any you no longer need.
- Old iOS and iPadOS update files may be in ~/Library/iTunes/iPhone Software Updates.
Clear Log Files
Log files are safe to delete.
- Open Finder > Go > Go to Folder.
- Enter ~/Library/Logs and /Library/Logs.
- Move old logs to Trash.
Remove Disk Images And Archives
Downloads or archives (. zip,. dmg,. iso) can pile up over time.
- Search Finder for these file types and delete old or unneeded copies.
Advanced tip: Restart your Mac after cleaning to let macOS recalculate “System Data.”

Credit: www.guidingtech.com
Use Third-party Tools With Caution
Many apps promise to “clean your Mac in one click. ” These can be helpful, but there are risks.
What To Look For
- Only use tools with strong reputations (like DaisyDisk, CleanMyMac X, or Onyx).
- Always review files before deleting.
- Avoid “Mac cleaners” from unknown developers — some are malware.
Non-obvious insight: Even popular tools can delete browser history, cookies, and passwords if you are not careful. Always read what will be erased.
When To Use Third-party Tools
- When you need to visualize disk usage (DaisyDisk).
- When you need to automate cache and log cleaning (CleanMyMac).
- For advanced users: When removing leftovers after uninstalling complex apps.
For most users, Apple’s built-in tools are safest.
Set Up Good Storage Habits
Once you have cleaned your MacBook, smart habits will keep it running well.
Regularly Review Storage
Every month or two, check your storage usage and repeat key steps:
- Open Storage Management.
- Review large and old files.
- Empty Trash.
Store New Files Wisely
- Save work documents in iCloud or Google Drive.
- Keep only current projects on your Mac.
- Move completed projects to external drives.
Backup Important Files
Always back up important files using Time Machine or another backup tool. This protects you from accidental deletion.
Avoid Downloading Unneeded Files
- Only download what you need.
- Clean out Downloads folder regularly.
Pro tip: Set up a “To Sort” folder for new downloads, so you do not lose track.
How Much Free Space Should You Keep?
To keep your MacBook running smoothly, always leave some free space.
- At least 10–20% of your SSD should be free.
- For a 256GB MacBook, that means at least 25–50GB free.
MacOS and apps need space to work with files, update, and cache data.
What Happens When You Run Out?
- Apps may crash or refuse to open.
- System updates can fail.
- Mac slows down or becomes unresponsive.
Insight: Always aim to keep a buffer — your Mac will thank you.
Real-life Example: Managing Storage Without Losing Work
Maria is a university student with a 128GB MacBook Air. She needs to keep her schoolwork, family photos, and music but her storage is almost full.
Here’s what she did:
- Used Storage Management to find large files.
- Enabled iCloud Photos with “Optimize Mac Storage.”
- Moved old essays and projects to Google Drive.
- Deleted old Zoom recordings and unnecessary downloads.
- Set Mail to only download recent attachments.
- Emptied Trash and cleared caches.
Result: She freed over 35GB, kept all important files, and her Mac runs like new.
Key lesson: Managing MacBook storage is possible without losing important files — it just takes the right steps.
When To Upgrade Storage
If you have tried all the steps above and still need more space, it might be time to consider an upgrade.
- External SSDs are affordable and fast.
- Cloud storage plans (e.g., 200GB iCloud for $2.99/month) are cheap insurance.
- For old MacBooks, internal SSD upgrades are possible (for tech-savvy users).
External recommendation: For more details on Apple’s official storage upgrade and backup suggestions, visit the Apple Support guide.
Frequently Asked Questions
How Do I Free Up Space On My Macbook Without Deleting Photos And Documents?
Use iCloud Photos with “Optimize Mac Storage” to store full-resolution photos in the cloud while keeping smaller versions on your Mac. Move large documents to external drives or cloud storage like Google Drive or Dropbox. Always check Storage Management to review files safely.
Why Does My Mac Say “system Data” Is Taking So Much Space, And Can I Reduce It?
“System Data” includes caches, logs, and other files. You can reduce it by deleting old caches, logs, disk images, and iOS backups. Restart your Mac after cleaning to let the system recalculate and show free space.
Is It Safe To Use Cleaning Apps Like Cleanmymac Or Daisydisk?
These apps are safe if downloaded from the official website and used carefully. Always review which files will be deleted and avoid removing files you do not recognize. For most users, Apple’s built-in tools are safer and enough.
What Happens If My Macbook Storage Is Almost Full?
MacOS and apps may slow down, crash, or fail to update. Always try to keep at least 10–20% of your SSD free for smooth operation. Use Storage Management to quickly review and free up space.
Can I Expand My Macbook’s Internal Storage?
Most new MacBooks do not allow easy internal SSD upgrades, but you can use fast external SSDs or cloud storage for extra space. For older MacBooks (pre-2016), upgrading the SSD is possible but may require professional help.
Keeping your MacBook fast and free of storage issues is possible — and you do not need to risk losing your important files. With the right tools and habits, your Mac will always have room to work, create, and store memories.